Pages

Showing posts with label DC23. Show all posts

Monday, April 8, 2013

Ma.K tattoo decal painted

Got tired of painting battle damage and paint chipping on the Ironman statue yesterday. So I thought I'd work on my Ma.K kit today for a change.

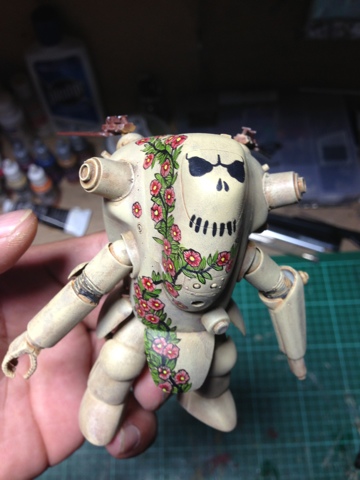
This kit is fully handpainted. Rough dry brushing gave it a nice textured finish. I also thought of putting tattoo style decal painting on this kit and so I did.

The cherry blossoms painting is done and will be sealed with gloss coat for water slide decals application later. Washes, weathering and paint chipping effects should complete this little kit soon.

I use Vallejo paints as usual for this build. Hope to finish this soon... Hope you like it so far. Thanks for dropping by! Until next post guys! :)


Read more >>

Friday, April 5, 2013

MG Acguy verDC23


 DC23 here sharing another old work from my blog. :)

Hello guys, this is my first 2010 kit and this is my entry for our ZeroGunz Pinoy GB, One of the rules is to make a clean build and the color should be predominantly red, blue or yellow ( base on the Philippine flag colors ). Anyways this was a fun build, eventhough cutting out the armor parts to reveal the internals is a bit tedious, other than that the painting session was a fun experience. it was my first time to freehand a camo pattern. The camo pattern is a vain attempt to make it look like whale skin and also I made a few booboos with the build. The finish has a sandy texture, looks ok but not intended definitely. I hope rubbing compound will solve the sandy texture effect...if not, it's ok.

Here is the link of the WIP of this build:

And here are some pics...


Read more >>

HG 1/100 Exia diorama verDC23

DC23 reporting again. This is also a very old work most likely buried in the archives of forums. Thought I'd re share it here in our new group blog. :)

I finished the Dynamez way back September 2008, V-fins are not even sharpened actually...basically the dynamez is one of my old works, it is painted with spray cans and was a fast OOTB build. I then decided to battle damaged it to serve as a complimentary piece for my 1/100 Exia.

There are no mods to the Dynamez and the base is made up of wood, styrofoam for the hill and my Wood glue + real sand = real looking texture technique.

After roughly 3 weeks of basic work with my 1/100 Exia, finishing it around May 28 2009...it is finally done...Help has arrived for Dynamez ( which was done/weathered around May 4 2009 )!

The conncept is simple...the Exia was still being repaired when the post of Dynamez was detected and attacked! So, even though the repairs on Exia are not finished yet...it has to support Dynamez in the battle...

I call this dio " The Final Stand "....well it simply looks that both MS are engaging in a final stand to defend something right?

The Exia has simple pla plating to enhance the detail only...but during the build or modding stage, I am pretty much conscious not to overdo it and upstage Dynamez in the final dio. Thus, I did not change the rubber parts and did not put any metal thingees on the Exia...and also I changed the blue tone of the Exia to give it a more serious-clinging to survive kinda look...hoped it worked.


Read more >>

MechCrazyCustoms TOP3 in first week! Thank You!


Thank You in behalf of all the contributors of this humble new Group Blog!

There are not much Gundam or Hobby bloggers in the Philippines in the first place though. You could visit TOPBlogs for a few of the most visited Gundam blog sites in the country, but other than the list at TOPBlogs there are not much you could find around the net that is ran by Filipinos.

So topping at TOPBlogs is not much of a feat to be honest, nevertheless it is still so gratifying to see our one week old group blog hit those marks.

Just wanted to THANK everyone who has visited our young blog so far! Hope you enjoyed your visits and return as we try to provide you interesting Gundam and Hobby related stuffs everyday. Until next update guys! Just enjoy the hobby! :)


Read more >>

Scribing Panel lines tutorial by DC23

DC23 here just sharing a really old tutorial from my blog. This is basic scribing of panel lines guys... hope this helps! :)

I am not good with scribing panel lines...but I just want to share how I scribe panel lines step by step. I decided to scribe some of the major parts of the Acguy coz the surface is too round for pla plating...well, it can be done...but it's rather difficult than scribing lines along the surface. After taking pics of the Acguy, I realized that I have to add a few more panel lines on the upper arm and forearms of the kit...I will also need to try to scribe on those round shoulders and hip armors...those are tooooo round for pla plates but may also be too round for panel line scribing...will try later. I also added a hole on the chest part to expose the cockpit...will cover this with clear plaplate after painting. Anyways here are some pics...

FIRST, draw your desired pattern, I keep them simple coz I am not good at it and I'll be doing pla plating with most of the parts after anyways...


SECOND, using a Hasegawa needle point scriber...I pierce the corners...


THIRD, I use an eraser template ( thin metal ) to guide me from corner to corner...


FOURTH, I scribe with the Hasegawa needle point scriber and run through it with very light strokes...


FIFTH, I run my Tamiya scriber twice on the groove with light stroke...


SIXTH, I sand the piece with 400 grit sandpaper and will sand it before pla plating with 1200 grit sandpaper...


Tadah, my technique is faster than tapes and other methods that  I know....did all the parts in the pic below in a couple of hours only. hihi


Now here are some pics of the progress of my MG Acguy, will add a few more panel lines on a few parts, then do pla plating madness and clean up the holes...


BTW, I also drilled a hole in the chest part to compliment the collar armor and also sawed the stomach armor into three parts.


UPDATE: 12-20-09 : small update on the holes...

Hello guys, I cleaned up the holes with an art knife yesterday...actually I did this in the office around 3 pm to 7 pm...I was only on duty until 4 pm and while I was waiting for our Christmas party at around 8 pm, I did some much needed cleaning up of the holes...the only uncleaned part was the armors at the head. All of the parts will be further polished with sandpaper and some filing, but it is slowly forming up. Anyways here are some pics...


Read more >>
Related Posts Plugin for WordPress, Blogger...