Hello Folks! It's been a long time since my last post here at Mecha Crazy, really sorry bout that but I got slapped in the face and now I'm writing this blog post hehe :)
Anyway here's my current WIP, a Sinanju Stein with my custom Inner Frame which gives better proportion and a slight boost in articulation. I've been at this project since I got my MG sinanju stein back in early 2013 and so far this is where it stands. Let's start with an OOTB (for those of you who don't know OOTB is Out Of The Box) picture of the Stein from Dalong.net (which EVERY and I mean EVERY Gunpla modeller should know).
My Opinion on the Stein? It's very plain - which to some modellers, is an advantage.
A few months working on and off, trying different things, and this is how it looks at the moment. As I said earlier I'm using my custom Sinanju Inner frame thus the very unique/different torso design. To cope with the huge torso I've had to extend the upper arm and the ankles and right now for me the proportions couldn't get any better
Now let's do this from top to bottom.
Close up on Torso - I also chose to use the Original Sinanju's Fin.
Shoulders - Nothing Special I just added panel lines here and there to break the monotonous look of the armor. For now I also use the shoulder pads from the original Sinanju. It's been having some conflicts when the shield is attached so I may revert back to the Stein's shoulder pads but I'm keeping these for now.
Arms - One of my favorite parts of my build. I've added so many parts to give it an armored gauntlet feel. To make it look like it can block a blow from another sword using only the arm guards. I also chose to keep the Nu ver. ka style hands. Later on it got tricky for me since I had to add a connection for the Armed armor DE. Luckily was able to find a very ingenious way of making that attachment :) No panel lines yet as I haven't finalized a pattern.
Rear view
Front View
Front Skirt - Added a random part to bulk up the "crotch", did some armor separation on the front skirt and topped it off with a few more panel lines. I have an idea at the back of my head to change the side skirt but it is still on the drawing board. Soon as I see it is feasible and when I gather all the parts (requires 3 shoulder armors for one side, total of 6) I should try and post an update.
Back Skirt - I was looking for parts from my scrap to kit bash onto the back skirt of the stein and stumbled upon the MG Unicorn's backskirt. Upon test fit I notice how similar both back skirts are and decided this looks good for my theme. Finally add a dash of panel lining to the side of the back skirt and the opening flap on the Unicorn's back skirt. May return to this later for more panel lines.
Legs - Well the Legs, I think bandai makes it a point that the legs are one of the best features of all their designs. After all this is where the "shifting armor" started. This is actually the part I've spent most of my time working on. So again let's start with an OOTB picture (again from Dalong) of the stein's legs
Annnnnnnnnd here's mine....Following the theme of my kit (which for now is secret) I thought that "Evo-ing" the legs (or the whole kit) would be a nice move. So I made the gaps between the thigh armor bigger, Separated the side leg armor into three parts (compare from OOTB picture) (third part is not installed yet), replaced the back of the leg thruster with the Unicorn's and finally add a dash of panel line. Actually there's alot, but I used 0.15 to panel line so it's not that obvious on the picture. I will "widen" the panel lines later on. There's a panel line on the back leg thruster, (I used 0.4) on that one so it's visible on cam.
Oh and I also use the sinanju's toes instead of the Stein's.
Backpack - Last but definitely not the least. Well for now It may look simple, but I've got big plans for the wings I'm gonna attach to the backpack. Again it's still on the drawing board so I haven't finalize any. Thanks to my friend and co-author here at MechaCrazy Gian Siopao who was willing to trade some parts with me, and was able to get another Stein Backpack. What you see below is two Stein Backpack joined together by the same attachment the MG Unicorn has for it's backpack (Sinanju ver.ka, Unicorn MG, and S. Stein have the same connection points). Simple? Well for now. Once in painting stage I'm ditching the OOTB thrusters for Metal Parts *bling* *bling*

I also have a "spine" for this guy which I am still trying to improve. (You can notice it does not appear on the above photo). I'm trying to make the spine stand out when in "rear view", I really want the spine to be my "trade mark" modification. :P Once I've made further improvement will re-install to give my build some "Back Bone" (lame joke)
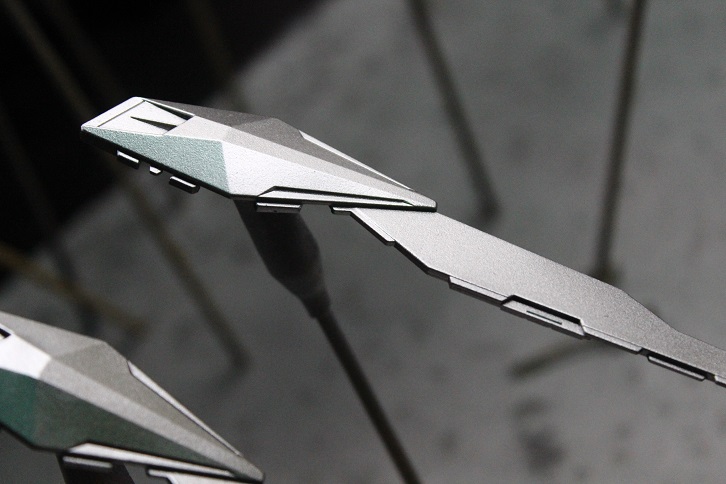
Weapons - Finally, this is the latest part of my WIP. I've just managed to complete my "Divine Rapier", I thought a BFS (Big F*cking Shield) would go great for this guy hence an Armed Armor DE from the Unicorn line. I'm still having second thoughts on the spear. I am having seriously hard time RESTRAINING myself from scribing panel lines on the Armed Armor DE, it so plain the possibilities/patterns are endless!!!
Note though for others who wish to purchase the BFS (Big F*cking Shield) aka Armed armor DE. IT IS EFFING HEAVY for your model kit. You will have MG Qan*T issues with it because the unit you put it on will tilt to one side. It is so heavy I had to install this flexible tube from Hobby Base (think zaku cables that are very very stiff, they are the clear plastic that goes from one shoulder to the other) between the shoulders of my kit for support, amazed that it solved the problem. I hate weight issues.
So to wrap up my update - I leave you with this rather old picture (taken around march I think). A size comparison between an MG 1/100 Sinanju ver. ka, my Unit 01 Sinanju and my Unit 02 Stein. Note that the Sinanju Ver.Ka is one of the tallest MG's that we have.
Please stay tuned for the next updates as well post of our other authors! Thank you so very much for taking the time to read my uber long blog post I sincerely hope it didn't bore you.